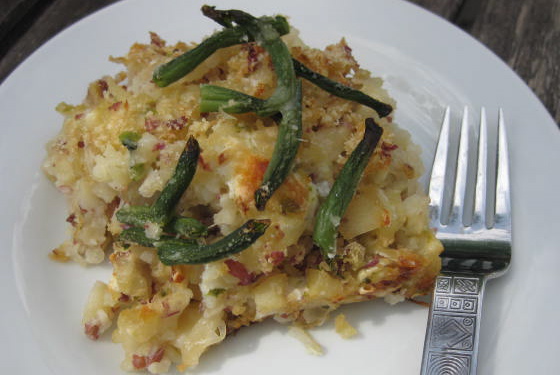
Potato and Sauerkraut Hotdish

IMG_3115

This is the crowd pleaser of all crowd pleasers – the “MUST HAVE” on the holiday table, the easiest thing to bring for a potluck, and well, AMAZINGLY delicious. Let’s just say this is one old-fashioned, the-way-it-used-to-be-before-canned-soup HOTDISH! But potatoes with sauerkraut? This lesser known concoction was brought to the Midwest by our creative German ancestors and usually contained sausage or bacon. (I know, I can hear you right now, “Ooh bacon, that’s a good idea!” Don’t even think about it!) My mother learned of the recipe from a neighbor who originally hailed from the Pierz area of Minnesota – a German stronghold. Hotdish tends to be very provincial as each kitchen cook has their own secret ingredient. If you prefer to call it a casserole then we’ll know you’re not from Minnesota!

Midwest church-goers are famous for their potlucks where you can find Tuna, Hamburger, Tator Tot as well as other noodle, meat and canned soup concoctions. For some reason my family always called these things casseroles, and tuna was the only one I was familiar with thanks to Grandma’s inability to cook, and my parent’s strict adherence to the edicts of food improvisation.

Unfamiliar, that is to say, until I entered the hot lunch program at my local Elementary School. I took a brief foray away from vegetarianism and learned the nuances of true Midwest Culinary Cuisine. Not only did I enjoy the hotdish repertoire, but it was in those cafeterias that I learned of “Shit on a Shingle” – otherwise referred to as “Chipped Beef on Toast.” I also had the pleasure of discovering Spam, American Cheese slices, and Corn Dogs. You must remember, I was a child of the “Back to the Land” movement. I knew where food really came from so this highly processed stuff was totally foreign to me. It also drove me quickly back to the comforting lap of the vegetarian diet.

Don’t get me wrong, I love hotdish. I am by nature, a lazy cook and lover of all things comfortable. I love the ease of the one pan meal and the idea that I won’t have to cook for a few days as with casseroles, if you’re not feeding a crowd, there are leftovers.

A couple of years ago my mom came to one of the family dinners with this potato and sauerkraut casserole thingy. It got high approval ratings from everyone, especially my potato loving husband. I’ve never had to make it only suggest that Mom bring it for our gatherings, but as the red potatoes from the CSA keep rolling in, I decided it was high time to make my own hotdish. So I called Mom for the recipe. My mother cooks like I do – it’s always a creative process, there is never a recipe and if an interruption occurs during the preparation, the meal is terrible!

Here’s my mom giving me the “recipe.”

“Well, you just need to drain the sauerkraut and boil the potatoes. Then I saute the sauerkraut in a lot of butter with garlic . When the potatoes are done, break them up; Don’t really mash them, just smash them, and add them to the sauerkraut. I like to put jalapenos in it and some cheese. That’s it, then you bake it.”

“What kind of cheese do you use?”

“Whatever I have. I always have lots of cheese. I might use feta or mozzarella. I always put parmesan in it- whatever you have. I wouldn’t use cream cheese or sour cream because I don’t like those.”

Thanks, Mom!

Making this casserole really got me excited about making sauerkraut as well. I have a huge cabbage from the CSA so I think I’ll give it a try. Here’s a great link showing how to make Sauerkraut. I was interested to find that during WWII it was considered patriotic to make your own sauerkraut. I never knew sauerkraut to be a particularly political pickle.

Ingredients:

  • 1 large jar or bag of sauerkraut – 32 oz.
  • 5 pounds new baby reds
  • 1 stick butter
  • 3 cloves garlic
  • 1 jalapeno diced
  • 1 pound fresh mozzarella
  • 1/2 cup parmesan
  • 1 cup chopped green beans (optional)
  • Idea Note: Chopped herbs would be fabulous to add to the top or incorporate into this dish.

Directions:

Boil the potatoes until tender. When they are cool enough to handle, smash them with a potato masher. Drain the sauerkraut well and meanwhile saute the garlic in melted butter. When the garlic releases its fragrance, add the sauerkraut and saute for a few minutes. Mix the sauerkraut with the potatoes in a big bowl. Use a food processor to chop the jalapeno and mozzarella. Mix everything together. Pour it all into an oiled baking pan. Sprinkle the parmesan on top and decorate with green beans. Bake for 1 hour at 375 degrees.

Lemon Spice Cookies

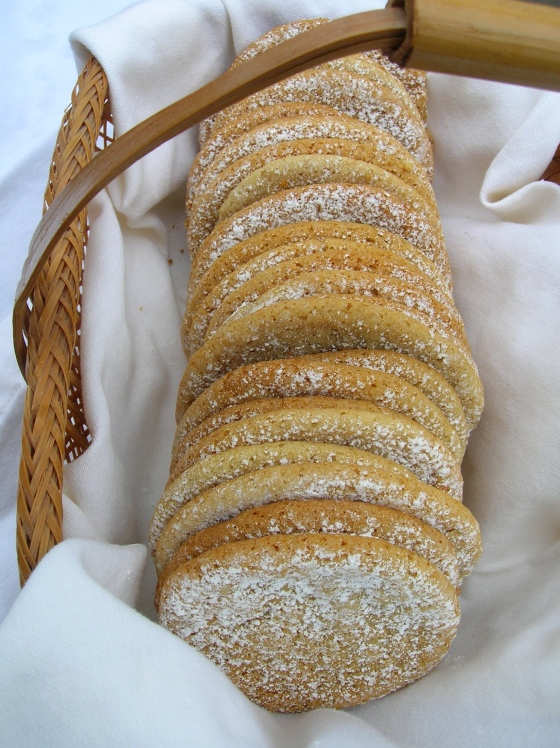
Feeling like your holiday cookies need a little updo? This lemony ginger spice cookie may just be what you are looking for! This cookie’s chew is addicting, the flavors fresh and intriguing, and oh so perfect for the holiday tray with a little dusting of snowy white confectioner’s sugar. If you’re like me and hardly ever bake because you can’t live with the temptation, this is the perfect cookie. These cuties don’t last long if anyone else is around.

I originally posted this recipe a couple of years ago when lemons filled my mind for days. Lemons are enticing, but what caused this recipe creation was not only the idea of lemons, but a divine Indian dish with coriander…hinting of lemon! Sometimes obsession and distraction make for a happy child. A sudden urge for a really good chewy cookie and voila was born the lemon spice cookie recipe that had been floating around in my head.

When the idea hit me, I knew I would base the recipe on my childhood favorite chewy gingersnap recipe from The Joy of Cooking, but with lemony spices instead of molasses and cloves. I would use lemon zest, lemon grass, ground coriander and ground ginger. To lighten the color of the cookie, I replaced the molasses with honey. I was hoping for the crinkle effect of a gingersnap, but for some scientific reason, that did not occur. Does anyone know why not? I used baking soda and vinegar…doesn’t mixing these two cause the chemical reaction needed to make cracks in the cookie…or is molasses involved?

I’ll include the original gingersnap recipe below as well. If you love chewy cookies, it’s an amazing recipe.

Ingredients:

Makes 4 dozen cookies

  • 3/4 cup butter
  • 2 cups sugar
  • 2 eggs
  • 1/2 cup honey
  • 2 tsp. white vinegar
  • 2 tsp. vanilla
  • zest 1 lemon
  • juice 1 lemon
  • 1 Tbs. finely pureed lemon grass (I used Gourmet Garden Lemon Grass prepared product)
  • 2 tsp. ground coriander
  • 2 tsp. ground ginger
  • 1 1/2 tsp. baking soda
  • 3 3/4 cup all-purpose flour

Directions:

Preheat oven 325 degrees.

Cream together the butter and sugar. Add all the other ingredients except the flour and mix well using a hand or stand mixer. The last step is to add the flour and mix together well.

Form dough into 1-inch balls. Bake on a cookie sheet for 12-15 minutes. When the cookies cool, cover them with sifted powdered sugar.

Gingersnaps from the Joy of Cooking

Preheat oven to 325 degrees

Cream together:

  • 3/4 cup butter
  • 2 cups sugar

Stir in:

  • 2 well-beaten eggs
  • 1/2 cup molasses
  • 2 tsp. vinegar

Sift and add:

  • 3 3/4 cups all-purpose flour
  • 1 1/2 tsp. baking soda
  • 2 to 3 tsp. ground ginger
  • 1/2 tsp. cinnamon
  • 1/4 tsp. cloves

Mix ingredients until blended. Form dough into 3/4 inch balls. Roll the balls in sugar. Bake on a greased cookie sheet about 12-15 minutes.

Mint, Lemon and Garlic Scape Dressing

IMG_3289

Garlic scapes are the delightful necessity of the garlic plant. In order to transfer energy to storage in the bulb, we humans stop the reproductive process of the plant. The garlic is making seed in the scapes, and if we steal these delicacies, we also benefit from a generous garlic bulb. I only know this because I am the dwarf in the garden, “standing the shoulders of giants!” Some smart grower discovered this manipulation of nature, and now we all benefit! After cutting the scapes, growers let the garlic bulbs bulk up for about two weeks before digging. Once the garlic is out of the garden, I will hang it to cure in the barn for a few weeks, sort by size to keep the biggest for next year’s crop, and begin to the cloves it into my other summer favorite garlic recipe: Chimichurri!


Most people who try garlic scapes love them. In terms of texture, they are a solid juicy vegetable that even veggie haters can enjoy. And, yes, they taste like garlic, only more mild in flavor. There is no prick of heat that raw garlic bulbs give off. These can be munched raw, roasted or turned into any variety of pesto or salad dressing without any intense garlic off-putting. It’s unlikely that garlic scapes will function as well as garlic bulbs for a vampire deterrent.

IMG_3294


Since our garden is not only giving generous quantities of garlic scapes but lettuce and mint as well, I decided salad dressing would be the next scape recipe. As you all know by now, I am the jazz musician in the kitchen riffing on this, mixing in a little Doo Wah Diddy and throwing in a little Ella Scat for my final notes. In other words, I will give you the approximations for ingredients and then expect you to build your own composition. The key to salad dressing is the balance between acidity, salt, sweet and oil. You want it to zip and glide to give a full-mouth pleasurable sense. Jazz it up until that is achieved!

Ingredients:

  • 6 garlic scapes
  • 2 large handfuls fresh spearmint leaves – (Idea: add other herbs like dill, fennel, arugula, basil, oregano)
  • 2 lemons zested and juiced
  • 1/2 cup white balsamic (or any white wine or champagne) vinegar
  • 1 cup olive oil
  • 1/2 tsp. salt
  • 1/4 cup honey
  • 1/4 cup maple syrup

Directions:

Use a blender. Put all of these ingredients into the blender and zing on high until the dressing begins to look creamy. Taste. Adjust. Enjoy.

Energy Bars

photo(3)

I’m not sure that any of us really need any more energy, in the sense of calories, in our lives! The calorie is easy to find around these parts, but it is nice to have a treat now and then. I’ve been making way too many of these, so trust me, if you want to put on weight, this is what you should eat. These are very densely packed calorie bombs that will surely keep you moving if you know what’s good for you! This would be a great snack to carry with the road bike crew or mega run in prep for a marathon. Of course, a bite or two for your average teacher is a good thing too! These are stored in the freezer and best to eat when frozen.

Ingredients:

Chocolate Coconut Banana

  • 2 cups Medjool dates
  • 2 cups raw cashews
  • 1/2 cup raw almonds
  • 1 cup cocoa powder
  • pinch of sea salt
  • 1 banana
  • 1/2 cup unsweetened grated coconut

Chocolate Cherry

  • 1 cup Medjool dates
  • 2 cups dried cherries
  • 2 cups raw almonds
  • 1/2 cup unsweetened grated coconut
  • 1 cup cocoa powder
  • pinch of sea salt

Apricot Orange

  • 1 cup Medjool dates
  • 1 cup dried pineapple
  • 2 cups dried apricots
  • 2 cups raw cashews
  • 2 mandarine oranges zested and juiced
  • a pinch of sea salt

Lemon Coconut

  • 1 cup Medjool dates
  • 1 cup dried pineapple
  • 1 banana
  • 1 cup unsweetened grated coconut
  • 2 cups raw cashews
  • 2 lemons zested and juiced
  • a pinch of sea salt

Orange Cinnamon Chocolate Apricot

  • 2 1/2 cups dried apricot
  • 2 cups Medjool dates
  • 2 cups raw cashews
  • 1/8 cup nutritional yeast
  • 1 cup cocoa powder
  • 3/4 cup sprouted and dried buckwheat groats
  • 1/2 cup dried pineapple
  • 2 clementines zested and juiced
  • 1/2 tsp. sea salt
  • 1/2 tsp. cinnamon

Directions: Add all ingredients to a food processor and pulse until the mixture comes together. If the mixture is too dry, add more dates or a dash of water. Pour the mixture onto parchment paper to form a flattened square. A pastry blade is helpful to shape the edges. Wrap in parchment and place in a baking pan in the freezer. When frozen cut into one-inch cubes and store in the freezer.

Plum Galette

Do you ever wonder what happened to good old-fashioned pie? Do you occasionally crave it, then find the slice that sits in front of you to be woefully inadequate? What happened to that thick slice of pie chock full of fresh fruit with a richly flavored, not-too-dry yet flaky crust?  I sometimes dream of that pie, but so often forget it can’t be found in a bakery. We can all find lots of mediocre pie at chain restaurants and grocery stores but if you want to find the real thing, you might be looking forever. Perhaps some nice old Finish lady in Northern Minnesota could hook you up, but if you’re looking in a store or pastry shop, you’re probably out of luck. I feel bad for kids these days because I don’t think they’ll ever know what pie really is. There is just something about old-fashioned pie that can’t be replicated in the bakery kitchen.

Having grown up with a nice old Finish lady to show me the ropes, there are a few things I know. First, butter is a must. I am a practicing vegan except when it comes to pie – no margarine allowed. The dough has to be cold, cold, cold so leave it in the fridge for a good long rest before you roll it. And finally, don’t roll your crust too thin. It’s just a beautiful thing to eat a slice of pie from tip to crust – to end with a generous chunk of flaky dough lightly kissed with caramelized fruit juices and sugar. Mmm mmm!

I know that one problem with pie is that it seems too difficult. So many of us just don’t have the time anymore, so I made a galette instead of pie. Galette is a fairly easy alternative allowing for free form rather than fussing with a pie pan and crimping edges. Fortunately, with a galette, we still get that old-fashioned sense of the pie!

Ingredients:

Crust: For a really clear and easy-to-follow recipe, see Elise’s directions at Simply Recipes.

Filling:

  • 6 red plums
  • 2 Tbs. flour
  • 1/4 cup granulated sugar
  • 1/8 tsp. nutmeg
  • 1/2 lemon juiced
  • 1 beaten egg
  • turbinado sugar

Directions:

  1. Preheat oven 350 degrees.
  2. Cut the plums either into small chunks or thin slices. Place them in a mixing bowl.
  3. Add flour, sugar, nutmeg and lemon juice and mix.
  4. Roll out the pie crust to about 1/8 inch and place on parchment covered cookie sheet.
  5. pour plum mixture into center of pie crust. Push all the plums together into a tidy flat circle.
  6. Fold the pie crust up over the plums crimping the dough where it doubles over itself.
  7. Brush the dough with the egg wash and then sprinkle with turbinado sugar.
  8. Bake for about 50 minutes until the dough is browned.

Green Juice For Life

This was breakfast. Not breakfast for six people – breakfast for two. Can you imagine the workout trying to eat all this veg in one sitting? It’s a daunting task to think about, but not if you’re a juicer. I juiced this lovely bowl of veg this morning for breakfast and with that was able to get closer to my body’s daily requirement for vegetables. You see, I found out the hard way, exactly how many fruits and vegetables we really need to stay healthy and fit – it is a lot!

The hard way? You ask. Let me back up.

I recently discovered I suffer from inflammation which over the years has caused my body to fight against itself. My cells have been attacking the high acidic foods I eat, so my white blood cells, in constant combat position, have had no time to build my body’s immunity. Over time, my body began to show symptoms that something was wrong. I began to gain weight – especially belly fat, I often had migraine headaches, I had trouble waking up in the morning, I was grumpy much of the time and I developed red tingly toes. If you Google red tingly toes, they’re a symptom of many illnesses like obesity, diabetes, lymes disease, heart disease, nerve damage, depression and inflammation.

Since my husband has Lyme’s Disease, I decided to start with a visit to the doctor in order to rule that out as well as other concerns like allergies, a possible thyroid problem, vitamin or mineral deficiency issues or some unidentified ailment. Blood tests and other diagnostics showed that according to mainstream thought I had nothing wrong with me. My doctor was left stumped and unable to provide an answer. I knew from my obsessive love of food that diet can often be the underlying cause of diseases and ailments, so I decided to take treatment into my own hands.

At the same time I was experiencing these weird symptoms, Jeff’s Lyme’s disease was causing him to suffer excessive fatigue and pain. In researching how to help him, we both stumbled across information regarding ph neutral diets and the connection to decreased inflammation. Diet, not buckets of medication, seemed to be the answer. I also watched a couple of food documentaries that prompted me to address my symptoms with diet – they were, Fat, Sick and Nearly Dead, Forks Over Knives and Crazy Sexy Cancer. It seems that there are a couple of factors that come into play when you eat a mostly raw diet. First you feed your immune system lots of vitamins and minerals, and secondly you are getting enough enzymes to aid digestion. The Standard American Diet (SAD) is very high acidity and low enzyme and that seems to be what causes most of our ailments – everything from type two diabetes, heart disease and many cancers.

So here I am today, twenty pounds lighter, unbelievably happy, and symptom free! And, it was easy thanks to green juice and smoothies! I love vegetables, but I’ve always reached for breads or other grains first to satisfy hunger. Juicing helped me to cut all food cravings out of my life. I find the juice so satisfying that I don’t need much else. I started with a juice fast of about ten days. I wasn’t a purist about it as I had a few salads and a couple of sprouted grain veggie sandwiches over the course of those ten days, but overall, I drank freshly made vegetable juice and I drank as much as I wanted.

During that phase of the plan I also drank HUGE amounts of water and a cup of Smooth Move tea each day. I had read that some people get constipated when they first start a juice fast, and part of the idea is to remove all the toxic build up from your body. You want to sweat it out, flush it out and brush it off your skin, so exercise, drink lots of water and exfoliate the skin. Two days into the fast I felt happier than I had felt in years and I began to lose weight right away! It was very exciting as I had never been able to successfully diet in my life.

Once the fast was over, I simply continued to juice using juice as a meal replacement for breakfast and lunch. For dinner we eat huge salads with greens, chopped veg, nuts and my homemade balsamic dressing. Fats are important to consume so oils from nuts and seeds, olive oil and avocado are all completely acceptable and necessary. Notice the diet is mostly raw foods, however we do eat roasted cauliflower, broccoli, and sweet potatoes as well as a variety of cooked beans. I have found that a small amount of sprouted wheat breads don’t bother me, so I love to eat hummus sandwiches with sprouts, avocado and tomato. I’m sure as the winter months approach we’ll be adding soups to our diet as well.

I cannot express enough how satisfying and liberating this style of eating is. Menu planning is simple, grocery shopping is simple and food preparation is a breeze, but the most amazing thing is how good we feel. This has not been a diet for me, but a lifestyle change.

Here’s the quick and dirty of what I learned and what I do:

Cut Out:

  • most grains (except a small amount of brown rice, quinoa and wild rice)
  • potatoes
  • sugar
  • coffee
  • alcohol
  • dairy products
  • animal products
  • any processed food
  • any food containing white (white flour, white rice, white pasta, white tortillas, etc)

Eat Organic:

  • fresh vegetables and fruits – as many as you want
  • nuts and seeds
  • sprouts
  • olive oil
  • green tea and herbal teas

Do:

  • Meal replacement with freshly made juice or smoothies
  • Make your own sprouts
  • Exercise 3-5 times per week

Green Juice Recipe I

Ingredients:

  • 4 apples
  • 2 peeled lemons
  • 1 bunch curly kale
  • 1 bunch bok choy
  • 2 zucchini
  • 1 small chunk fresh ginger

Green Juice Recipe II

Ingredients:

  • 4 apples
  • 1 lemon
  • 1 fennel bulb with stems and fronds
  • 1/2 bunch celery
  • 1/2 head cabbage

Directions: Wash and prep the vegetables then run through a juicer. (We have a Breville Juice Fountain Ikon.)

Honey Brittle Nut Bars

These bad boys fall into the dessert category for me, so I wouldn’t normally encourage anyone to have such treats around the house, but my dad’s honey is just the most amazing thing, and I wanted to come up with a way to really highlight its sweetness.

In an effort the last few months to stay away from grains, raw almonds have found their way into our pantry along with a few other nuts and seeds like cashews, pumpkin and sunflower. Apparently when eaten in small quantities, these powerhouses of life provide healthy fats, omega-3 as well as a myriad of other vitamins and minerals. That is when they are raw. Turning them into dessert by toasting them probably diminishes much of the health benefits. Regardless, these brittle bars are a really tasty snack made from all whole foods. If anything, they are a good source of energy for your average marathoner or long-distance biker. Since Jeff completed 72 miles this morning, I think I’ll encourage him to have a few of these!

Once these cool, they do become brittle, however as they rise to room temperature the honey begins to soften. I would recommend cutting them and storing them in the freezer in an airtight container.

Ingredients

  • 1 Tbs. coconut oil
  • 3/4 cup honey
  • 2 cups whole almonds
  • 1 cup whole cashews
  • 1 cup hulled pumpkin seeds
  • 1/2 cup sunflower seeds
  • 1 cup large flake coconut
  • 1 tsp. flaked kosher salt

Directions:

In a non-reactive sauce pan slowly melt the coconut oil. Add the honey and bring it to a simmer. Stir frequently and allow the mixture to simmer for about ten minutes.

While the honey simmers, toast the nuts separately as the small ones will burn if you try to toast them together. After each batch is toasted pour them out onto plates to cool in a single layer.

Once the nuts are all toasted and the honey has simmered and evaporated for ten minutes, pour the honey mixture over the nuts and mix well.

Pour the mixture out into a 9×9 square baking pan lined with parchment paper. The bars will be about an inch thick in this pan. Use another sheet of parchment on top to press the mixture firmly together.

Place in the refrigerator to cool.

Cut into squares and store in airtight container in freezer.

Rhubarb Sorbet with Garden Herbs

Here’s the local beat in Minnesota right now: mint busting out of its pots and rhubarb galore! Why not have a tart little midsummer cool-down treat.

Ingredients:

  • 4 cups rhubarb, very thinly sliced
  • 1 cup water
  • 1 cup sugar
  • 3 large sprigs mint
  • 1 sprig oregano
  • 1 Tbs. triple sec
  • 1 Tbs. Grenadine Syrup

Directions:

  1. Simmer rhubarb, water, sugar and herb sprigs until the rhubarb is soft and begins to break down.
  2. Refrigerate until the mixture cools.
  3. Remove herb sprigs.
  4. Puree mixture and add triple sec and Grenadine.
  5. Freeze in ice cream maker.
  6. Transfer to freezer container an allow to freeze for at least four hours.

Sesame Slaw with Golden Beets and Kale

The only way to get my son to run errands with me is to bribe him. As you can imagine, this can sometimes be costly and frustrating! But getting him to the coop is easy and free…all I need to do is remind him of the samples! He usually lingers by my side in the fresh foods area picking out bananas and other fruits, but as soon as we turn the corner, he beelines to the deli for samples of cheese, spreads, crackers and salads. The other day he came running up to me with a little cup filled with some sort of a kale salad.

“Here Mom, this is for you. I thought you’d like it. It has kale.”

“What is it?”

“It’s a kale and golden beet salad from the deli.”

“Did you try it?” I asked incredulously thinking the coop had cast some sort of spell over the boy who hates vegetables.

“Of course not! It has kale. I got it for you.”

What a sweet boy and what a sweet salad. I knew from the first taste, something like it would need to come out of my kitchen. The coop salad had the same general flavor devised with sesame oil, sesame seeds and ginger that my recipe includes, but did not have raisins. Somehow a little sweet seems like a good pairing for the beets and carrots. I think some fresh fruit like chopped nectarines, mangoes or apples would also cut the bill. (What does that mean, anyway?)

Ingredients:

  • 3 large carrots grated
  • 1 large golden beet, peeled and grated
  • 1 bunch curly kale, finely chopped
  • 1 clove garlic, minced
  • 1 jalapeno, minced
  • 1-inch piece fresh ginger, minced
  • 1 cup raisins
  • 1/4 cup sesame seeds, toasted
  • 1 tsp. salt
  • 1/4 tsp. ground black pepper
  • 2 Tbs. sesame oil
  • 2 Tbs. olive oil
  • a few splashes of rice vinegar (2-3 Tbs.)

Directions:

Long grate the carrots by cutting them just the length of the food processor feed tube. Empty into mixing bowl. Next grate the beets the same as the carrots. I chose to quickly saute the golden beets in about a tablespoon of sesame oil as they were a titch bitter when raw. Leave them a little crunchy to the bite.

Mince the garlic, jalapeno and ginger in a food processor and add to carrots and beets in mixing bowl.

Remove the stems from the kale and chop the greens into fine pieces. The kale can be massaged to soften, steamed or sauted.

Mix all ingredients together in a mixing bowl and season to taste. Serve at chilled or at room temperature.

Cold Winter Curry

Oh, the flavors! Oh, the warmth! Oh, the kale! I can’t get enough of the stuff! I’ve consumed four large bunches and another of swiss chard this week – almost entirely on my own! Once I started eating it, I couldn’t get enough! The same happened with beets, and I think sweet potatoes must be right up there in the Gotta Have It department. While the rest of you “Master” cleanse, juice and go raw, I’m focusing on ROY G. BIV and powerful spices warmed to perfection!

In this recipe:

  • Red – tomatoes
  • Orange – sweet potatoes
  • Yellow – cauliflower
  • Green – kale
  • Blue/Indigo/Violet – last seen in Beety Tweety Bird Nests
  • Powerful Spices: Ginger, garlic, turmeric, cinnamon, hot peppers

Ingredients Chickpea Curry:

  • 2 Tbs. coconut oil
  • 1 small red onion, thinly sliced
  • 4 cloves garlic, minced
  • 1 inch fresh ginger, mince
  • 1 Serrano pepper, minced
  • 3 fresh tomatoes, blended
  • 3/4 can light coconut milk
  • 1 Tbs. ground cumin
  • 1 tsp. whole brown mustard seed
  • 2-3 tsp. Garam Masala
  • 1/2 tsp. salt
  • 4 cups chickpeas, pre-cooked
  • 1 bunch kale, finely chopped

Directions: Cook chickpeas or use canned. On medium heat, melt coconut oil. Add red onion and saute until translucent. Add cumin, brown mustard seed and Garam Masala to the oil for a quick toast. Next add garlic, ginger and chile pepper. All these ingredients should be cooked for a minute or so, just until the aromas are released. Next, add the pureed tomato, coconut milk and chickpeas. Allow to simmer on very low heat for about 5 minutes. Right before serving, mix in the kale cooking it just past raw to bright green.

Cauliflower and Sweet Potatoes in Madras Peanut Curry Sauce:

  • 1 head cauliflower, cut into florets
  • 1 large sweet potato, peeled and diced
  • 1/4 can coconut milk
  • 2 Tbs. creamy peanut butter
  • 1 Tbs. Madras style curry powder
  • 1/2 tsp. salt
  • freshly ground black pepper

Directions: Warm the coconut milk and the peanut butter in a small pot. When the peanut butter begins to melt, whisk the two ingredients together. Add spices and mix well. Toss in cauliflower and sweet potatoes. Allow to steam on low heat for a few minutes until vegetables are tender.

Note: I tried roasting the veggies with the sauce at 450 degrees. They cooked, but did not crisp at all. I love the idea of serving the cauliflower roasted like I did here. Next time.

Plantain Soup

It’s the time of year that my mind wanders off to Honduras, Ecuador and Mexico. I dream of warm weather, tropical foliage and platanos! Platanos are particularly important in the diet of Coastal Ecuadorians, and I don’t believe I ever had a meal that did not include them in some form. They usually eat the plantains green either fried, baked or mashed to make empanada dough. My favorite way to eat the platano is fried and smashed in what they call, “Patacones.” In other parts of Latin America fried and smashed plantains are called, “Tostones.” They are an acquired taste as they tend to be quite dry, but the minute I tasted them topped with hot and spicy Aji, I couldn’t get enough. Aji is a hot chile, cilantro and lime condiment served everywhere in Ecuador.

An Ecuadorian custom from the highlands  is to serve a light soup as a first course for the mid-afternoon meal, and it’s common to see a few platanos floating around the broth with diced potatoes and a sprig of cilantro. Slices of avocado, toasted hominy and Aji were always served with the soup.

Today’s recipe combines an Ecuadorian platano fetish with my never-ending quest for maximum nutritional value. Here you will find copious quantities of kale! And don’t even think about eating the soup without the Aji. Yes, it’s a condiment to be served on the side, but it without it, you’ll feel like you’re eating mashed potatoes without the gravy.

Ingredients:

Soup

  • 1 Tbs. canola oil
  • 1/2 red onion, thinly sliced
  • 3 cloves garlic, minced
  • 1 large sweet potato, diced
  • 1 large Yukon gold potato, diced
  • 2 plantains, peeled and sliced
  • 1 bunch curly kale, deveined and chopped
  • 8 cups water
  • 1 Tbs. cumin
  • 2 tsp. salt
  • avocado and lime as garnish

Aji

  • 4 Serrano peppers
  • 1 small bunch cilantro
  • 1 clove garlic
  • 1/2 lime juiced
  • salt to taste
  • splash water

Blend together in food processor or blender.

Directions:

Be careful not to overcook this soup. Serve immediately.

Heat oil in a stock pot. Add onions and cook until they are crispy. Next add the garlic and stir it until fragrant. Add water, cumin, salt, potatoes. Bring to a boil and cook until the potatoes are almost tender. Add plantains and cook for a few minutes until the potatoes and plantains are tender. Add the kale just before serving. It should just wilt and turn bright green. Serve with Aji, avocado and lime on the side.

Vitamin Supplement Number Two – Beety Tweety Bird Nests

Last week when I went for groceries, the goal was to make the cart look like a CSA box. Midwinter legumes, grains and soups have been great, but this time of year you may feel your body craves the vitamins from more rainbow-colored foods. At the grocery two things particularly caught my attention: beets and greens. I bought four hefty deep purple roasters as well as mounds of kale and swiss chard. Last week’s Beet Sweet and Kale Soup was so satisfying, I’m loving the look of the ruby-red long grated strands, so having two of the beets already roasted in the fridge made this warm salad really easy to make. I filled the nests with a Greek yogurt seasoned with salt, pepper and a bit of minced ginger, but can imagine them stuffed with sautéed mushrooms and goat cheese, humus, or just shaved pieces of Pecorino Romano.

This will make approximately two dozen nests depending on how large the beets. The beets I had were big ones – about four inches in diameter!

Ingredients:

  • 2 large beets roasted then grated
  • 1 inch chunk fresh ginger, minced
  • 1 clove garlic, minced
  • 2 Tbs. minced red onion
  • salt/pepper
  • 2 eggs, well beaten
  • 1/2 cup semolina flour
  • 1/2 cup all-purpose flour
  • 1/2 cup panko bread crumbs

Directions: Preheat oven 425 degrees.

Mix all ingredients and spoon into greased muffin tins. Use the back of a spoon to form an indentation in each mound of beets. Bake for 15-20 minutes. Remove the nests immediately from the muffin tins or they may stick.

Vitamin Supplement Number One – Beet, Sweet and Kale Soup

Enough of the death dirge already!  I hear you. A few of my “fans” have been concerned that the black shroud and “Mock Chicken” was a sign of death to the blog. Perhaps I was one of those bloggers not quite willing to come right out and wrap it up, you thought. Truth be told, I never intended to be away so long, but in all my moments of cooking, have had little to motivate. Summer’s end brought me back to work with no weekly CSA and little motivation. The family plate reverted to our standby Mexican stuffed burritos with a variety of salsa, simple soups or stir-fries. Not much that was blog-worthy, I’m afraid.

Today, the sun is shining brightly over Minnesota, and this winterized body is craving some vitamins. A stop at the grocery, and the fridge is filled with chard, kale, beets, broccoli and a variety of fruits. Here’s what I came up with for Vitamin Supplement Number One:

Ingredients:

  • 2Tbs. olive oil
  • 2 large beets, peeled and grated
  • 1 large sweet potato, peeled and grated
  • 2 cloves garlic, grated with beets
  • water to cover veggies
  • 1/4 cup rice wine vinegar
  • 1/3 cup honey
  • 1 Tbs. Garam Masala
  • Salt and pepper to taste
  • 1 bunch curly kale, deveined and sautéed in olive oil
  • Slivered almonds, toasted

Directions:

1) Wash and devein kale. Chop and saute in a splash of olive oil. Cook until just wilted and still bright green.

2) Grate sweet potatoes and beets. Place in large stock pot with olive oil and water to cover. Add salt and pepper, vinegar, honey, garam masala. Bring to slow simmer and cook until beets are just tender.

3) Toast slivered almonds in a dry skillet. Keep the almonds moving, and toast until the edges start to brown. Turn the toasted almonds out onto a cool plate.

3) Serve in large bowls with greens and toasted almonds on top.

Mock Chicken

I’ve often wondered how mock duck was made. I knew what it was – wheat gluten – but never knew what the process involved. I finally decided to do a little research only to realize that mock duck is basically a dumpling. It’s also very easy to make. I found a recipe on a site called,  Ma Cooks! and used this as the springboard for this recipe.You’ll notice by the garlic, cumin and oregano, that this mock duck is destined for a Latin American theme. In fact, I hope to use it to make green chile enchiladas.

Jeff returned yesterday from a conference in Albuquerque and upon my most pointed request, carried with him five giant tubs of frozen chiles. If you have never used frozen New Mexican chiles before, I highly recommend urging any friend traveling to the Southwest to traffic for you as much as they can carry. The Bueno Foods website will deliver six small containers for $25 dollars plus a $50 dollar delivery fee! I’m sure there are many New Mexican transplants who are willing to pay this exorbitant fee.

Ingredients:

  • 3 cups wheat gluten
  • 1/2 cup rice flour
  • 1 1/2 cups water
  • 2 tsp. salt

Stock:

  • 1 Tbs. canola oil
  • 1 large onion, diced
  • 1 large clove garlic, minced
  • 1 tsp. cumin
  • 1 tsp. oregano
  • 1 tsp. hot pepper flakes
  • freshly ground black pepper

Directions:

Mix the gluten, rice flour, salt and water together. Knead briefly until the gluten strands develop. Let the dough rest while you prepare the stock.

Use a stock pot to saute onions in the canola oil until translucent, add garlic and spices. Cook for a minute until the spices and garlic are lightly cooked and giving off aroma.

Add four cups of water to the stock pot and bring to a boil.

Lightly knead the mock duck dough and break into six to eight pieces. Once the stock comes to a boil, lower the heat to a simmer, place the mock duck dough into the water, cover and slowly simmer for about an hour.

Once it is finished, it can be sliced and added to any dish calling for chicken. I would caution you not to use it in really wet dishes as the texture gets a little mushy.

Garam Masala Vegan Dip

Living the vegan lifestyle is a concept that I both accept and deny. I love vegetables and cannot imagine eating animal flesh, yet when in comes to the satisfying creaminess of cheese, ice cream and other dairy products, the thought of giving them up, causes my head to involuntarily shake out a most-emphatic, “NO!”

I’ve found with a pizza oven in the back yard, dairy product consumption is at an all-time high around our house, and has given me a little pause. And although we’re still topping our little wood-fired babies with fresh mozzarella, Pecorino Romano, and Gorgonzola, I’ve begun to wonder about vegan alternatives to cheese.

I’m not yet ready to take the dive, but thought I would start experimenting with vegan cream sauces. This recipe has as it’s base walnuts, olive oil and tahini and when mixed with a little soymilk, turned white and creamy and sweet. I was surprised by how sweet my plain soymilk made the dip, so to make it savory for the cucumber sticks, I added garlic, white wine vinegar and Garam Masala. As you can see I served it with vegetables, but it’s very satisfying spread on crackers as well. I might try it another time, sans savories, as the cream filling for a chilled fruit tart.

Ingredients:

Sweet:

  • 2 cups walnuts
  • 1/4 cup tahini
  • 1/2 cup olive oil
  • 1/2 cup plain soymilk

Savories to add to Sweet:

  • 1 clove garlic
  • 1/2 tsp. salt
  • 2 Tbs. white wine vinegar
  • 1 tsp. Garam Masala

Directions: Mix all ingredients together in a food processor until smooth and creamy. Add more or less soymilk depending on how thick you want the dip.