Mucking in the DIRT – Get Messy with Me!

screen-shot-2017-02-19-at-7-30-36-am

Greetings to all my recipe loving adventure seeking friends! I wanted to let you know about my new project over at Driftless Dirt. I’m still going to be posting a recipe here and there, but the new escapade involves a lot more about life on the Driftless Dirtfarm. If you like laughing at a city girl living in the country, gardening, watching flowers grow, doing crazy projects, building things, tearing down things, or watching tractors drive by, you might want to check it out. I hope you will subscribe to the website so I can dump a little Driftless Dirt in your mailbox! Click the link or picture above to go exploring! See you soon.

img_6329

Farm Exteriors Uplifted

When we bought it, this sweet house and all of its fifteen acres was nearly overgrown and smothered by giant ragweed, nettles and burdock. A storm, a week or two before we closed on the property, left tree limbs strewn about so we couldn’t even see the granary down the hill unless we were positioned just right in the yard. From the house, the first day we spied on the place, we didn’t know about the granary or the pig barn as they were nearly overgrown. I was fixated on the house at first and gave little thought to the land – that would come later, in my mind. However, we would soon learn that land is the main concern in the country!

IMG_0689

Looking up towards the house when we found the granary.


Brushpiles and Barn

Granary with dead branches and weeds – the view from the yard.


IMG_0581

The clay tile pig barn nearly overgrown with elms and burdock.


img_2703

The pig barn after trees and weeds were removed. It’s in rough shape, but we hope to preserve it as best we can.


IMG_0682

We begin clearing the land a few weeks after the purchase.


View from Bedroom

The pump house fondly referred to as “The Snoopy House.”


img_1959

The new roof goes on a very hot day. The original forest green shingle siding was practical, but not cute!


img_2024

The pump house – clean and crisp! No more red and green.


img_2031

Pump house gets decorated! And the door eventually gets painted black.


IMG_0583

Our first day at the house – the realtor had just mowed so we could get a good look.


Southwest Corner

Future site of the deck off the kitchen.


West Exterior

We moved the sliding door, added windows and converted entirely to electric and wood.


Slider moved and windows added

Here is the deck in progress. The vinyl siding went off and on a few times during the projects before we replaced it completely with fibre cement board.


Building the deck off the kitchen

Western exposure makes for a hot deck in summer afternoons.


IMG_1177

Deck is done, siding back on, new windows and painted trim. Notice by now it is Fall!


IMG_1694

The following Spring/Summer we build the screen porch and prepare for perennial gardens to plant the following Spring.


IMG_1888

New windows in the porch and tiny plants in the deck side perennial bed.


IMG_2729

A Summer and Fall of work and the siding and new roof are on.


North Exterior

North side of the house and the bathroom/laundry room addition added by previous owner.


IMG_2730

Northside with addition of screen porch, deck, siding and steel roof.


Roadside View

Before: East side view of the property with vinyl siding. This is the roadside view.


img_2056

East side making progress.


IMG_2733

After: Eastside view from “front” yard.


Driveway and Garage

Before: Garage in need of some TLC.


Garage Exterior

Garage looking to the East on the day we closed. The doors hadn’t been closed in years according to the neighbors.


img_1884

Bodega added to garage for wood storage.


IMG_2727

The garage and bodega with gutters to catch rain water that runs in underground pipes to a cistern near the gardens.


IMG_2459

We will be warm for the winter!


IMG_2677

A bike trellis made by mom in one of her creative bursts! A great signature piece for the boy’s garage!


IMG_1171


IMG_0489

View towards the porch the day we bought the place. June 2013.


IMG_1885

Renovating the porch windows March 2015.


IMG_2279

Steel roof went on summer 2015.


IMG_2676

A new Spring 2016 ready for border gardens.


IMG_2436

Spring 2016. The house is done except bathroom remodels.


IMG_2739

Lap siding combined with board and batten.


IMG_2728

The “Driftless Dirtfarm” is taking shape.


IMG_3164

Deck garden the first summer – I will need to do some dividing soon!


Lessons in Gardening with Weeds

IMG_3638

Are you in a battle against weeds? A lot of the articles I have read about weeds argue it is important to know what kinds of weeds you have in order to effectively control or combat them. But I would also argue that it is important to understand why they are in your garden in the first place. Their presence tells a story, and I have come to learn that they cannot be beat. We must join them!

Since owning this farm, I have learned a lot about weeds, how to manage them and how to get completely bamboozled by the little stinkers! Weeds in the country are brawny and bold. They will not stop or pause for much. I have come to understand why it is that farmers use herbicides, because stopping a weed from doing its job is next to impossible. That’s right, weeds have work requirements, and contrary to popular belief, their main duty is not to aggravate humans! I try to empathize! Weeds do a great job protecting our top soil from eroding. Weeds spread low and wide often to do this. Other weeds send down long tap roots to bring minerals up out of the soil, and some weeds deliver nitrogen to nearby plants. And we all know, bees love their flowers!

IMG_3643

Here we see the spread of dandelion, crab grass, clover and chick weed all working together to cover unprotected soil.

Of course, my vegetables have a hard time growing with too many weeds as neighbors, so I do have to work at taming them.

When we first moved here, our first line of defense against the weeds was the mower. Mowers are very handy machines that are quite effective at keeping weeds at bay. Continuously cutting them back often causes their demise. If not complete death, they are at least stunted or camouflaged as lawn.

IMG_3640

Weeds in the gravel driveway!

This Spring was early which gave the weeds a jumpstart. By June my gravel driveway was completely invaded with weeds that had nestled in between the small rocks and set roots. What do you do, weed your driveway? I figured there must be an ecological perspective about how to manage this problem. I need the driveway to give support to the cars or they would squish down in the soil when it rains. In my quest for an answer, I read an article about seeding runways in Alaska with fescue. That seemed to be the answer to my problem. I seeded the driveway and now mow it very short. It hasn’t completely filled in yet, but it actually looks very nice – a little hard to find the driveway from the road – but visually attractive. The weeds can still be on the driveway, but they will be camouflaged by grass. I can live with that.

IMG_3639

Driveway after seeding (first year).

But what do you do about the weeds that are in the cracks, under trees and in other hard to reach places? Well, in the city a layer of landscape fabric and 4-6 inches of mulch usually does the trick. Out here, that’s laughable! I found out the hard way that weeds in the country simply pop right up out of landscape fabric no matter the thickness or industrial strength. Mulch also poses a problem in that its little crevices are the perfect place for all the airborne seeds to land. One year after mulching in the country, you will likely find a whole slew of dandelions, burdock, thistle or crab grass just to name a few. Mulch is really just compost feeding any happy seed trying to grow in it. It seems to me that anything that will cover and fill in quickly is key. Our farmhouse gardens have these plants growing like living mulch and they do a great job making the landscape look attractive and weed free.

IMG_3653

White blossoms, loves shade, doesn’t spread overly quickly…no idea what it is.


IMG_3655

No idea what this is called.


IMG_3652

Violets cover the perennial bed between Lilacs and Mock Orange bushes.


IMG_3651

This stuff looks like Queen Anne’s Lace when blooming in June, but it’s low-growing and does not have a tap root like the wild carrot. Anybody know?

In my quest for weed management, I also learned about energy displacement. Take burdock for example. Burdock sends down a deep tap root and foliage that resembles rhubarb. If you let it grow, in the late summer it has spiny little flowers with a pinkish purple hue. These lovely spiny flowers dry out and become the burrs that cling to your dog’s fur as they run for a stick. But, if you know how burdock grows, you will know that it takes two years to flower. The first year it spends its time making a huge tap root and lovely foliage. The second year the root grows again and by mid summer, it will send up a shoot where the seed heads will form. If you cut it right around the time it is trying to seed, you kill its energy supply. You can also effectively kill it by chopping burdock off just below the surface of the soil – basically slicing the top off the tap root. The last week in June or first week in July has jokingly been dubbed, “Burdock Eradication Week.” I spend the week with a sharp shovel or edger jabbing the huge foliage leaves off the root. I have not completely eradicated the burdock from my property, but with careful management like this it is doable. Cutting back the burdock provides a huge nitrogen supply for my compost!

IMG_3658

Pretty burdock flowers!

Thistles on the other hand! What the heck! I get that these guys are 1) prolific, 2) tenacious and 3) bringing minerals to the surface, but they will beat you off if you move into their house!

IMG_3647

Thistles in mass where potatoes once grew. This area has raised beds with at least four inches of straw to cover. We laid industrial grade landscape fabric under six inches of wood chips last year. This year, thistle mass despite black plastic!


IMG_3646

The LOST Garden – completely overrun with amaranth and thistle.

And, I apparently moved into their house. Last year we built our second permanent raised bed circle garden and enjoyed one year of perfection. The garden was a beautiful addition to the property and I had lots of fun with the extra space. This year, however, is another story. Our warm winter, very little snowfall and early spring allowed for the weed seeds to get a head start, and the thistles celebrated! Last year I kept them smothered in straw, green manure and garden plants. This year they had a homecoming party before I even got into my galoshes to check out the gardens. I tried in vain to pluck them into submission, but by the end of June I had to quit. I shut the gate on their house and will not return until next year with a new strategy in my back pocket.

These guys need the old-fashioned till and dry treatment first. I’m thinking constant cultivation will help sprout, dry and kill a few of these buggers. Then I’m hoping buckwheat as a cover crop and its allelopathic tendencies will help prevent lots of seeds from germinating. To help keep the soil covered and not invite a new crew of weeds, I will till in the buckwheat and seed with winter rye. That will help smother out the little rascals in the fall and spring. Once that gets tilled in, I will have the added benefit of improved soil. I may even repeat the whole process again with another round of buckwheat and rye before I even consider planting another vegetable garden in that spot. Don’t I sound smart! Watch for future “eat crow” episodes where I again honor the weed! Any suggestions besides, “Hey, Sarah! Use Roundup!” are welcome.

So, what have I learned about living in the country? First, I have learned a little about how to manage weeds, and that there is a whole lot I don’t know! More importantly, I have learned to find ways to live with them. It seems that understanding their purpose has helped me feel better about coexisting.


Making Do Farm Porch – RENOVATION COMPLETE!

Farm Porch Finally DONE! – Revised August 2016

IMG_3438

It’s time to introduce you all to the newly renovated farm porch! It’s been done for a while now, but it never dawned on me to update this post! So, here you have it. Now the porch has all new windows, built-in storage for wood and seed starting materials, a big coat closet, cute entry with galvanized shoe bins and a cabinet for spring potting or crafts.

The rack you see in this picture is what I use for my seed trays in the spring. Little seed babies love the southern exposure and warmth of this room, so it functions as a quasi greenhouse of sorts. Jeff did the build out in March, but I didn’t get the painting done until a few weeks ago! It has been a very lazy summer at the farm for me – shhhh, don’t tell Jeff that!

IMG_3613

New porch closet for coats and big storage shelves for seeds and stuff.

IMG_3435

The lids of these bench seats are on hinges so they lift up and provide all the space inside the bins for wood, kindling, paper, potting soil, bird seed for the feeders, my seed trays when not in use and other potting materials. I love how I can have all that junk, but nobody can see it! NO VISUAL NOISE!

IMG_3612

Shoes are easy-off as you walk in from the gardens, and if you need to lace-up, there’s a nice bench to rest your bum! We also added that western-facing window, so now we can see out over the lawn and gardens and far-off hills – a beautiful view, for sure.

IMG_3611


Here’s where the mess can happen come Spring – seed trays can be filled and plants potted on this easy-to-clean potting bench. The cabinet holds my canning equipment and the drawers have some house tools, the mouse traps and other miscellaneous craft or “junk drawer” stuff – so handy – and again, lots of junk NO VISUAL NOISE!

Remember my TEMPORARY fix back in 2014? That was better, but SO much better now! Thank you, dear husband! Scroll even further down to remember what it looked like when we bought the place in 2013. It’s come a long way!

Temporary Makeover July 2014 – Ahh! Much Better.

IMG_1422

Our farmhouse porch faces south with a full wall of old broken windows. It is our hope to someday add floor-to-ceiling windows and create a solarium space for seed starting, potting and other plant related projects, but until that project queues up, I figure I need to be able to live with what we have.  I’m not one to have patience for dirt and grime, so in a fit of mid-day frenzy induced by rain, I decided to paint the porch. My main goal – brighten and clean.

The previous owner built this funny work bench and paneled the walls in plywood. It was farm practical, but farm girl unapproved. The grimy dog-scratched doors were gone last summer. We were thrilled to discover the upstairs bedroom doors were actually full-view double paned exterior doors, so we were able to use one of them for the kitchen entry off the porch…much prettier…still needs to be painted, but prettier!

IMG_0499

IMG_1480

Clearly, this space was also used for the animals, so it had a subtle smell of wet dog and cat urine. Mice also travel through and occasionally don’t make it, so the bench boxes where they nested and died, smelled of mouse. I found some old junk when I was cleaning. Of course, I hoped to find the farmer’s buried treasure – perhaps a gold brick or at least a can of old coins, but instead I found old building materials, clothespins and a gun cleaning kit. Just what I was looking for. I did score an old pickle crock without a crack or scratch!

IMG_1421

Since the name of the makeover game was make do, I used what paint I had leftover from interior projects. After removing all the nails, screws and miscellaneous hooks, I primed the walls and white washed the old bench. The only floor choices available were turquoise or white, so I opted for blue seeing that this is a major entry often covered with mud. If it were just up to me, I would prefer the white. People think I am crazy when they see the white floors inside the house, but so far the color has worn well, and it is easy to wipe up if need be. I love the bright fresh feel of it. This below…not so much.

IMG_0498

Now we have a lovely place to work with plants, hang our sun hats and prop our toys.

IMG_1478

We even have a place to rest our weary bones! – One of the joys of going to the Cities is to find thrift store treasures for the farm – $10 for the wicker at my favorite ARC Value Village!

IMG_1477

The upstairs bedrooms had all been trimmed out in a stained pine I referred to as “Cowboy Trim.” We replaced it with a milled trim to match the 1870s trim in the living room, but saved the cowboy pine for projects. Jeff made the wood boxes from that old trim to store logs, kindling and paper for winter fires.

I like the “Make Do” porch so much, I may not be inclined to do the real remodel for quite some time!

IMG_1476

Daisies in the Driveway

IMG_2704

I went traipsing through the property looking for tell-tale signs of Spring. Muck boots are an obvious give away as are snow-speckles dotting the grass, water dripping from the metal roof and puddles forming underneath the eaves. It’s such a wonder to me that we ever smile in a place like this let alone laugh or dance or celebrate. This land is sometimes so cold and unforgiving. Grays, whites, and browns dominate the landscape and are reflected in our wardrobes – gray jackets and black pants rarely meet up with a color more vibrant than navy blue or beige, yet many a Midwesterner can muster a joke and smile here and there. In photographs, Midwesterners force a toothy grin, yet Mother Nature says, “Be serene and calm and quiet in expression now.” Spring days like this remind us that we must practice patience and humility. Although, it appears our moles are quite unsettled and sophomoric!

Moles Running From Orchard

The only colors here are the occasional red of the highbush cranberry, the pig barn or the neighbors hay barn. If I am lucky, I will catch a glimpse of a male ring-necked pheasant dashing across the white snow, his red eye patches blinding bright red in a sea of white. A fleeting reminder of the debauchery and festivities to come when the riots of summer colors flood our senses.

IMG_2710

Above Lake Pepin, are BIG SKIES, big views and often high winds. Today, quiet gray serenity hangs low over the horizon and blocks out all remembrances of our summer spirit. Mother Nature holds her breath – the air does not move. Not even birds flutter about but instead wait quietly in their nests for the sun to dazzle us into sensual pleasures. Days like today remind us to sit and reflect and be still.

The Old Pig Barn

IMG_2708
IMG_2717

IMG_2715

IMG_2718

IMG_2720

IMG_2716

IMG_2709

IMG_2723

But, in the driveway, I find one vestige of summer, of the party that will come; of the laughs and celebrations and smiles, of the life that will give food and festivity, the sign that spring is upon us and Mother Nature will grant us permission to walk not with serenity and peace and humility, but with boisterous celebration and bombastic glee! A daisy grows green today.

IMG_2724

Farmhouse Kitchen Remodel – New Old Cabinets

IMG_2682

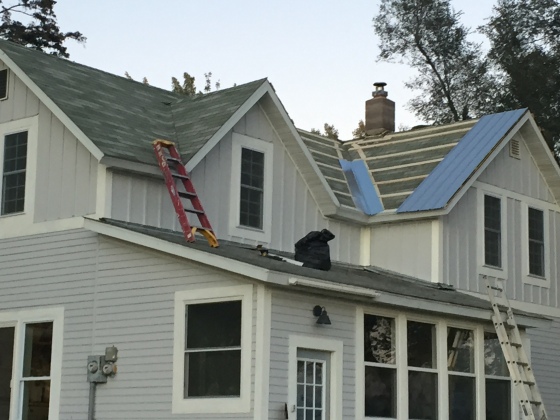
When this farm came on the market, we figured we’d do a drive by, but not likely buy it. For years we had been looking for country properties, but most of them were less than appealing once we got up close and personal. One property with the most amazing farmhouse and view of thousands of DNR wetlands had water in the basement up to the floor joists. It should have been classified as a wetland itself! Another property had a bedroom strewn with hundreds of guns and pond with a pink shell casing beach. Clearly full of shot and clay pigeon remains, we determined that pond to be poisoned. Asking a realtor to show these properties always seemed like a waste of time, so we learned most often to just drive by and check them out first. Occasionally, our interest would be peaked and we would enlist a realtor to show us around, but most often we were on our own.

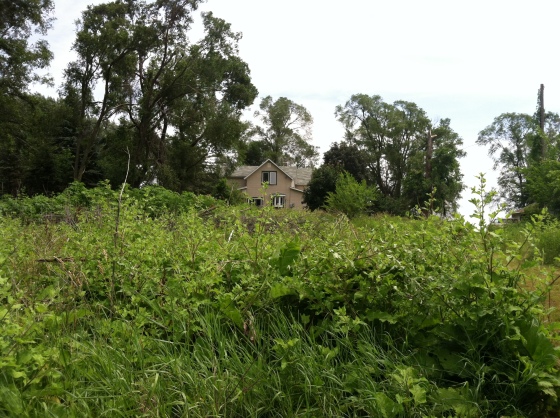
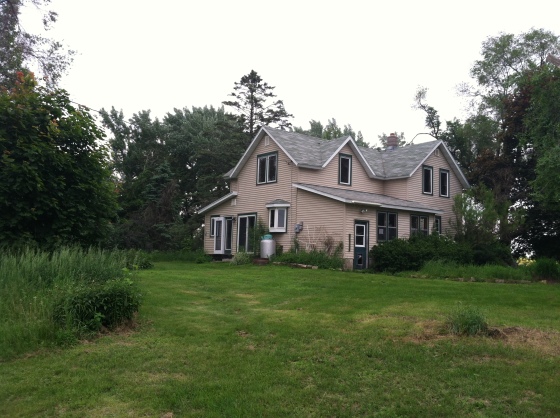
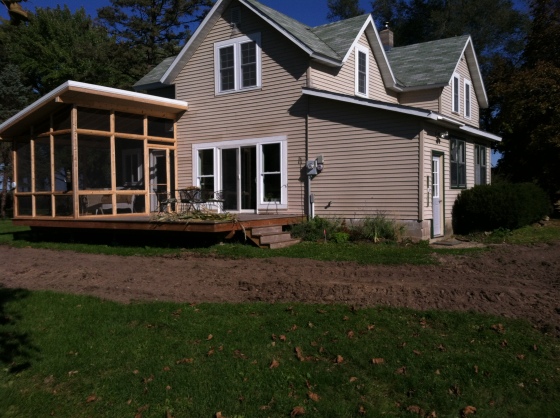
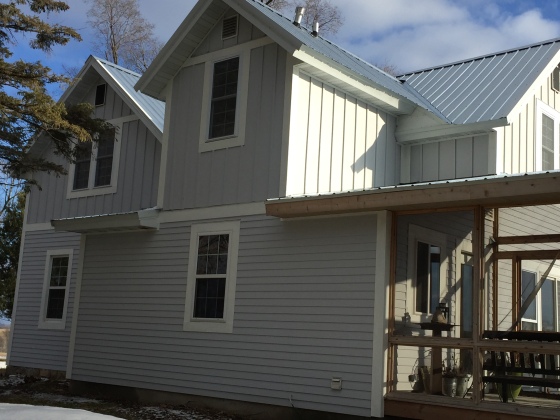
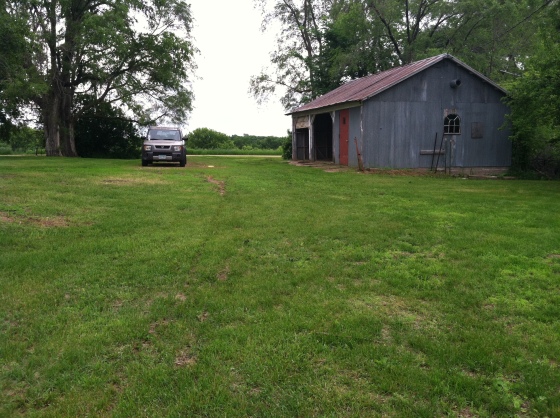
About five miles out from our Maiden Rock property, the rolling hills and expansive views began to pull at my heart strings, and by the time we were coming down the road in front of the farm, Jeff and I both found ourselves saying, “Oh oh! This could be good!” The site was spectacular and the farmhouse cute as cute could be.

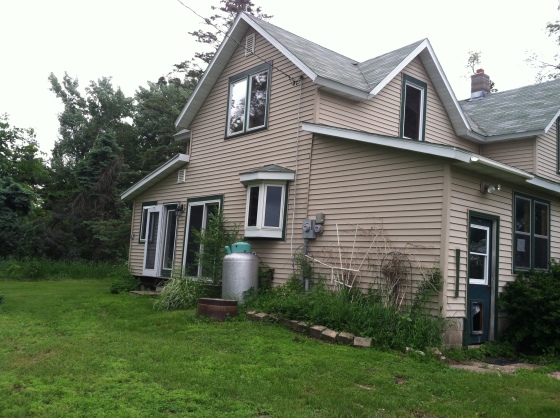
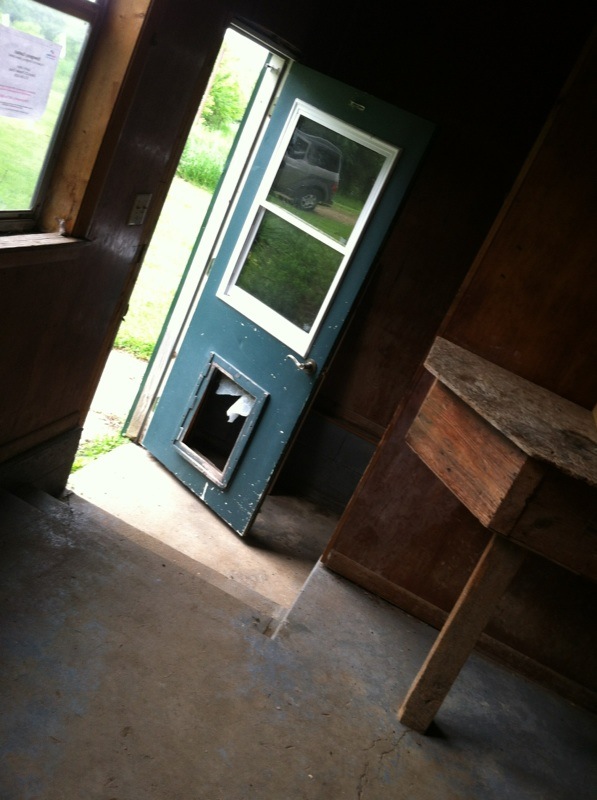
I went immediately to the house to find that the porch door was open. Inside the porch was a locked door to the main house, but an open window that went into the kitchen! I couldn’t resist, so climbed up onto the workbench and into the house. I opened the door for Jeff and within two minutes of walking around, knew we would buy it. Not only was the old farmhouse kitchen huge, but the master bedroom had two walk-in closets and it’s own bathroom! While entirely a mess and in need of some serious TLC, this was not your average farmhouse!

So, we’ve owned the place for nearly three years now, and we just finished the kitchen last week. When we originally designed the space, I thought I wanted a bank of new cabinets and a bank of rebuilt old cabinets. We purchased a shaker design white cabinet from Lowe’s, and in contrast to the chalk-painted old cabinets, the new cabinets seemed a misfit. Immediately, I knew I would have to find old cabinets to replace the new, and it wasn’t until we bought our duplex that I found the perfect cabinets. Although, I think Jeff would disagree – all the rebuilding would cause him to argue that they weren’t quite perfect!

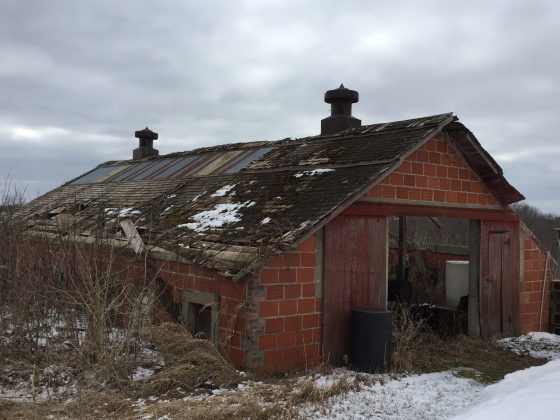
This first picture is what the place looked like when I broke in through the window.

Kitchen to Livingroom - Day of Closing

Coming from the city and turn-of-the-century homes where small kitchens were tucked into the back of the house, this layout made my design ideas gush! This kitchen says, “We take food very seriously here!” It is the center of the house with a big heart and spectacular views.

Window to Porch from Kitchen

Yep, that’s the window fortuitously open for me to take a stealthy look inside and quickly fall in love!

Beam and Looking to Kitchen

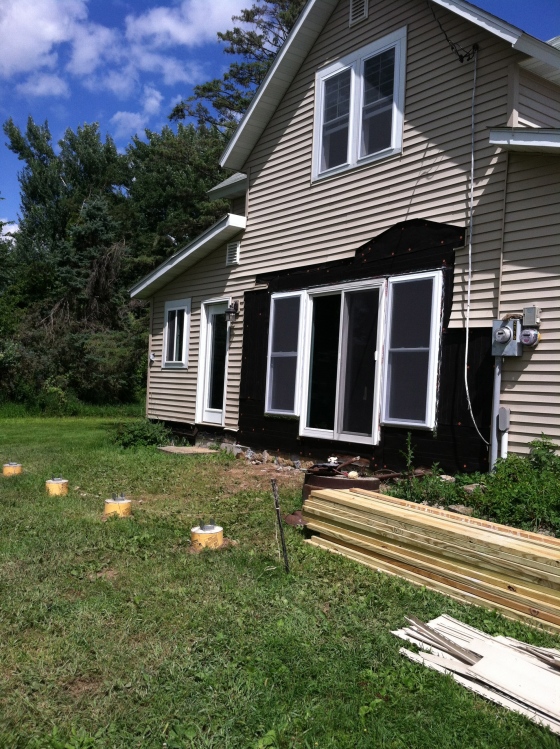
We removed the sink cabinets, centered the sliding door on that wall and added two large windows to either side of the slider to enhance the view and light.

North Minneapolis recycled kitchen buffet

The above cabinet came out of a house in North Minneapolis that got a kitchen expansion. Yes, it is quarter sawn oak, and yes, I painted it unapologetically. Notice the two flour bins. We use these for garbage and recycling.

New windows to the porch facing south

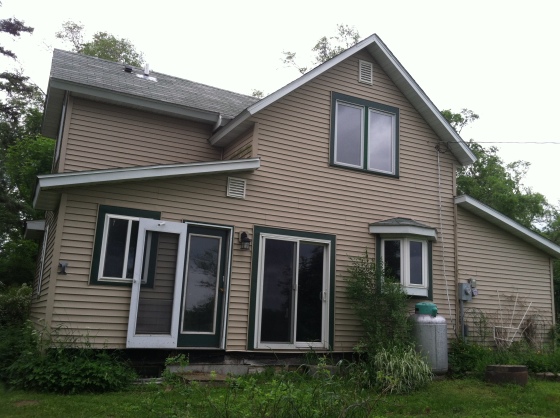
The window I broke into was removed to make space for two new windows that would allow even more light to fill the room with southern exposure.

Chalk painted cabinet

Let the priming and painting begin. Both of the old cabinets were primed and then chalk-painted with a Behr paint called “Pale Lichen.” I made my own chalk paint with flat paint and Plaster of Paris. This color is actually a bit green, but with the dark wax turned brown and with the clear wax looks mostly creamy in color tone. To celebrate the “Farmhouse Coastal” theme, the inside of each cabinet is coated with Behr “Lap Pool Blue.”

The cabinet is filling with dry goods

The photo below shows the Lowe’s new cabinets and a slide in range we scored from Craigslist. Someday I will have a signature range of some sort, but in the meantime, this Maytag stove was really cheap and nearly brand new. The farmhouse runs on electric with solar in our future plans. You might be surprised that I can cook on electric! This stove made the transition quite easy, actually. And, the solid glass top is so easy to clean up – I love that feature!

IMG_0950

The farmhouse kitchen originally had included not only the kitchen, but dining room, bathroom and back entry. So, once we removed the linoleum, we knew much of the floor would need to be removed and new flooring laid to remove the gaps where the walls for these rooms had once been. The picture above shows the dark original floor boards and the new lighter flooring primed and ready to paint.

IMG_2610

That brings us to last month. We were finally ready to begin installation of the new old cabinets that Jeff had pulled from the duplex and rebuilt. The white Lowe’s cabinets were removed allowing me to fill in the last of the little holes whose warm puffs of heated air invited mice into the kitchen!

IMG_2611

Much of the new old cabinets had to be resized and rebuilt to fit in this location. Jeff cut down one of the door cabinets making each of the doors smaller to fit this space, and had to build new cabinet boxes and a panelled end side. The old parts that remain are the doors, the drawer frame and the drawers.

IMG_2612

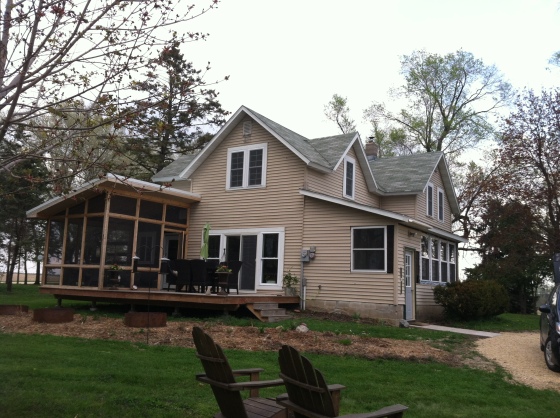
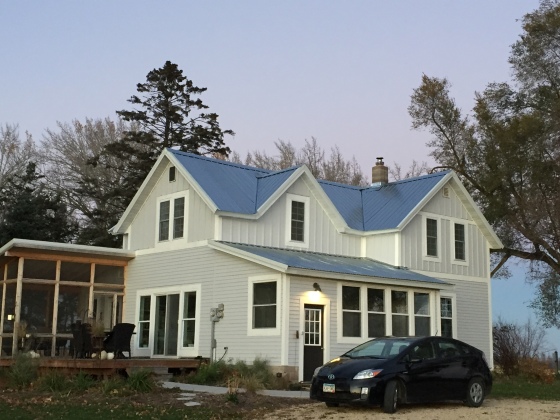
We celebrate the fact that our farm is above the Great Mississippi Flyway called Lake Pepin. This area lies in the “Driftless” area of Wisconsin forgotten by the glaciers and left with rolling hills and deep ravines. We designed the place to celebrate the water with a “Farmhouse Coastal” theme.

IMG_2615

For the last three years what we would do for a counter top was a great unknown. Many years ago, Jeff scored some beautiful marble from a rehab job at an old St. Paul fire station. The marble found a home as the wood stove hearth, counter tops for the old cabinet in the kitchen and a radiator cover in the living room. It was free and a perfect color for the farm. We priced out granite for the kitchen, but when the nearly $4,000 quote came back, I knew we would have to get creative. So, in the meantime, Jeff screwed the old refrigerator side panel to the top of the cabinets as a temporary counter top. It worked great!

IMG_2616

The old new cabinets got the same chalk-paint treatment as the other two, but this time I used a white wax making the “Pale Lichen” just a little creamier. We decided on stainless hinges and handles on this side of the kitchen to compliment the appliances and dishwasher.

IMG_2617

Now that the new old cabinets are in, I am feeling a bit more irritated with the white stove, but that will have to wait for a later date. I suspect I will search for a similar model, but in stainless. Although, I love the Northstar reproduction range in Robin’s Egg Blue!

Northstar Range

IMG_2681

We found a counter top! Rummaging around at one of our favorite Building Materials Outlet spots, we found some quartz counters for $300. Since the price would allow for error, Jeff decided to take on the challenge of learning to cut and polish this stuff himself. I am so proud of him! He cut out the sink bowl, buffed the edge to a shine, glued a small piece on the wall end to get the correct length and secured the backsplash. In our other renovations, counter top cutting and installation was a task we would contract out, but not any more! The color exchange between the cabinets and counter is a little more monochromatic than ideal, but for the price, it’s perfect!

IMG_2682

Remember the cheese grater light shades! I love the open shelving as well – a place to highlight our color scheme and a few favorite pieces.

IMG_2684

We got this old Kitchenaid fridge off Craigslist as well. It came with white bevelled panelling that we replaced with “barnwood” made from cedar fencing and stained with “Sunbleached” gray Varathane. It’s so tempting to go all “farm” theme with lots of weathered barnwood, but I tried to temper these peices to just a few. Our stove hood and fridge are covered with faux barnwood, and we have the old beam between the kitchen and living room. Of course, the signature farmhouse table stands as a stalwart symbol of the weathered barnwood look!

IMG_2685

The darker cabinet on the left was original to the house but had hung on the wall near the sink. This was painted with the “Pale Lichen” chalk paint and finished with a dark wax. The cabinet to the right is the old quarter sawn oak cabinet with the same color chalk paint as the smaller cabinet, but finished in clear wax. All hardware is original on both cabinets.

IMG_2687

What a view! And, we certainly managed to fill up the space. Someday I will get a real camera so the pictures can be better quality.

IMG_2688

Jeff built this table from a hand milled oak tree my parents gave him when they discovered he had a taste for wood-working. I love how he designed the legs to look so chunky. The thing weighs a literal ton!

IMG_2689

Remember, this is what the kitchen looked like before we started digging in! Now we have a kitchen that takes its farm lunch very seriously!

Beam and Looking to Kitchen

November Blooms

What a beautiful day! It was warm enough to work outside and decorate for the wintery season that will soon arrive, as well as enjoy some of the lasting flowers in the garden. This time of year in Minnesota and Wisconsin we go from warm and balmy to shoveling a foot of snow overnight. Northerners get to have a summer bouquet grace the table, and evergreen bough urns stand guard on the deck all while pumpkins and falling leaves still linger. For a few brief moments, the seasons nearly juxtapose. Of course, it is all we can talk about, too!

IMG_2463

Fennel, Mint, Feverfew, Boarage, Lavender, Russian Sage, Veronica, Salvia

IMG_2458

Wild grapevine with spruce, fir, cedar, arborvitae, wheat, grass and sedum.

Not only are many flowers still in lazy bloom, but my lazy girl garden is still laughing at me in hysteria! All summer long, I strolled the gardens with nary a weed pluck here and a little scatter mulch there. I ambled around picking a few of this and that for whatever I desired to cook, and hosted a few “garden walks” toting wine and garden appetizers. The summer was languid and luxurious, but as soon as September rolled around it was as if Medusa were out to get me. The joke’s on me! My days touring guests through the bountiful Victory Garden or imagining I was the host of some fabulous “Farm to Table” venue came to an abrupt stop as piles of tomatillos dropped to the ground begging to be gathered, pole beans began popping out of their shells as they dried and I couldn’t find enough people excited about ground cherries, beets, or cayenne peppers to relieve the pressure. The crazy bounty really began to mess with my OCD!

Cold weather looming demands the harvest brought in and the junk cleaned up. But, there just wasn’t enough time each weekend, and the “To Do” list kept getting longer. Furiously, I picked and put – into jars, pots, freezer bags, and neighbor’s porches! I even brought veg to the classroom to send home with students. They easily removed from my life over two hundred pounds of tomatoes, at least a bushel of ground cherries, not enough tomatillos and hot peppers to spice the lives of twenty-nine families! Thanks be!

The garden foliage removal has been the most beastly. You’d think yanking out old plants would be easy, but for some reason they grab and hold the earth not wanting to give up their reproductive tasks – go figure! To clean up ten tomatillo plants easily takes three hours and a strong back ache to follow.  Load after load of garden debris added to the compost pile with no machinery to turn it really makes you wonder what in the heck you’re doing. This is clearly how NOT to build a compost pile! To think part of my Peace Corps expertise was compost building! The country will always win! Mother Nature leaves you city folks alone much of the time, but out here, she holds a powerful wrath!

Obviously, I am smuggly blogging today feeling quite certain that my duties to the garden Medusa have been satisfied. Back to lazy girl gardening!

IMG_2433

Spring at the Farm 2015

This gallery contains 12 photos.

I’m here again for another summer – finally! Spring came early this year, so it almost feels as if I’ve crammed a summer’s worth of work into the March, April and May weekends. Projects are plentiful to say the least! … Continue reading

Put A Bee in Your Bonnet

Native Wildflower Nutritious Bee Forage Needed!

IMG_1503

I’ve got a bee in my bonnet.  As this idiomatic expression is defined by the Cambridge on-line dictionary, it means to continue to talk about something you think is very important even when others do not. Ha! I can tell you are laughing! Oh, she finally realized how irritating she is constantly talking about vegetarian recipes, juice and salad! You’re thinking I’m going to lay off and leave you alone for awhile? Maybe start posting about how to make marshmallows or some other confection using high fructose corn syrup, or bring you a mouth-watering line-up of fried fair-food on a stick? No. I’m off food for the moment, and am now perseverating over bee forage gardening. I’ve just got to tell you about it because I think you can help.

So, in June the United Stated Department of Agriculture (USDA) offered a program that will provide $8 million dollars as an incentive for farmers to set aside land that had been commercially grown, and instead, establish honeybee habitats. This money is designated for the five states where half, that’s right, HALF of the commercial US bee population resides in the summer months – you guessed it, Minnesota is one of them as well as Wisconsin, Michigan and the Dakotas. In February of this same year, the USDA designated $3 million dollars to support bee populations through conservation and environmental quality programs that involve setting aside 100,000 acres to grow native wild-flowers. I got wind of these programs through my dad sending me USDA links, and it got me thinking.

As a city slicker, I would not have likely noticed this news. As a foodie, I would have been a little curious, and perhaps developed a narcissistic worry over where my next plate might come from if the bee disappears, but now as a beekeeper myself, I see the need to act. I’m freakin’ out! Sometimes, environmental news seems so overwhelmingly sad – it is – but, in the case of the bee, I am hoping there is something quite simple and beautiful that we can all do. We can plant gardens! We can plant gardens full of bee-friendly flowers (without neonicotinoid-laden pesticides, of course) that will provide nutritious forage for our most important friends.

IMG_1507

The views at my farm are lovely, but after reading the news of late regarding bees, I see my property in a whole new light. Do you notice what’s missing? Sure there’s a bit of clover, a few flowers I planted, but in general, there’s a lot of open space that could become wildflower bee habitat. We do have a bit of meadow with wildflowers like milkweed, daisy and yarrow that provides forage for bees and butterflies, and I also planted a large circle of black sunflower that will look crazy-cool in  a couple of weeks. But, because the previous owners had animals, the burdock and thistle were thick and choking out nearly everything else. We decided to keep a large portion of the property mowed this year in order to cull those two particular species. As we have cleared the land, we have planted three varieties of clover as well as annual rye to give quick cover to the soil. But now I see that this is not enough.

Our Meadow with Milkweed

IMG_1515

So, I have been reading like crazy trying to figure out what flowers bees will like and what I can grow on the property. The USDA program suggests that the planting include a mix of annuals, perennials and sometimes native grasses. They also suggest planting in large swaths or patches at least 20 square feet. Below is a very large patch of Phacelia I found planted at a neighbors blueberry farm specifically placed for bumblebee forage. Apparently, it is the bumblebee who is the main pollinator for blueberries. I had never seen this annual before. It has a really beautiful blue to purple flower and when planted in mass it is quite stunning. The picture below shows Phacelia about two weeks after its prime. It also turns out that Phacelia can be used as a cover crop. Cover crops are used to add organic matter, aerate, protect soil from erosion or to provide or absorb specific nutrients. It turns out that Phacelia is good at absorbing extra nitrogen and calcium. That seems a good thing for a blueberry farmer who wants to keep lime levels low for the correct blueberry ph.

IMG_20140704_102140_578

I found this field of poppies at another farm near me, and these flowers were full of happy bees. In reading about bee-friendly flowers, I learned that bees go to poppies for their pollen to feed the babies rather than for nectar for honey. I also learned from visiting with the neighbor that her seed comes from the grocery – how convenient! The poppy seeds we buy for lemon poppy-seed muffins can also be grown for bee forage! So cool. I’ve not had much luck with poppies in my city gardens, but I haven’t given it much effort. Growing with Plants has great step-by-step instructions for planting poppies if you want to give it a try. They are so stunning in mass and even lovelier in a bouquet on the table!

IMG_20140704_101030_115(1)

So, here’s what I propose to do. I bought a bunch of bee-friendly flower seeds from companies that would not have seeds exposed to neonicotinoids, and plan to plant in large circular swaths. I bought large quantities of Lupin, Echinacea, Cosmos, Chicory, Wallflower and Black-Eyed Susans in addition to a smattering of other bee-happy plants like Betony, Flax, Daisy, Wild Indigo, Hyssop and Aster. I’m excited to create a visually stunning landscape over the next couple years, and add to a friendlier bee habitat. In the city, our entire yard is perennial plantings, and plan to add a few more patches of Black-Eyed Susan, Poppies and LOTS of Monarda. It seems to me that no matter how much land we have, we will all enjoy the benefits of building for the bees. Join me won’t you, to put a bee in everyone’s bonnet!

IMG_1551


Sam’s Produce U-Pick or Ready-Picked

Sam’s Produce U-Pick or Ready-Picked

IMG_1483

If you are a fool, you’ll drive Highway 10 east out of St. Paul in order to get to Sam’s Produce to pick your own strawberries, peas and other yummies in a little less than 90 minutes. If you’re smart, you’ll make a day of it. Drive Wisconsin’s Great River Road 35 through some of the prettiest scenery and charming river towns. You’ll stop at the Smiling Pelican Bakeshop for THE MOST outstanding baked goods ever, check out some art in one of the Stockholm galleries, think about Christmas shopping for some interesting linens and kitchen goodies at The Palate Gourmet Kitchen Store then have lunch at the Harborview Cafe in Pepin. Only then will you amble north on N or any other variation of back roads you can find to slowly take you to Sam’s outside Arkansaw, Wisconsin. Don’t be a fool and forget a cooler with a bit of ice, because you may want to take the same route home! A smartphone is also quite necessary for mapping purposes! Of course, getting lost could be fun if you’re up for adventure! Do make sure Sam’s is open for afternoon picking, or you’ll have to reverse the order of my suggested itinerary!

I rode out to Sam’s for strawberries with a neighbor from the area, Terry Cuddy. She hails from Rush River Produce (watch the video!) and runs a FABULOUS u-pick blueberry farm. (Plan another trip for blueberries beginning the third or fourth week in July or anytime through the beginning of September.) Knowing the area well, she meandered us around farm country north of Maiden Rock, through Plum City and down a few “Sleepy Hallow” gravel roads – wow! What amazing scenery! After today’s adventure, my To Do list now reads, “Take a Drive.” I’d love to get to the point where I “know the roads.” There are lots of 450th, 670th, 220th streets and avenues along with highways called N, P and D…it’s confusing for the city slickers!

IMG_1484

What a treat it was to not only see the scenery, but to sit in a row chock-full of perfectly red luscious berries. There is nothing better than a straight-from-the-vine freshly picked fruit. In my opinion, many commercial berries have lost that intense strawberry flavor. They seem to have a more intense sweetness, but less of that tart strawberry rush. The variety we picked at Sam’s was a smallish berry, not too sweet, but with highly concentrated flavor. In addition to being a bit less sweet than commercially grown strawberries, Sam’s berry was noticeably juicy. I suspect they were plump from all the rain we’ve experienced lately.

These incredibly juicy berries ended up in Romtopf, smoothie-ready frozen cubes, sauce with honey, and some were left whole and fresh for this weekend’s strawberry shortcake.

IMG_1488

IMG_1486

IMG_1495

Sitting in a field picking berries gives you time to think about the “farm to table” concept. While picking in Sam’s Produce fields, I thought about how Dan and Tammy and their kids prepare the soil, plant the berries, mulch them in the fall, uncover them in spring, worry about rain and pests and getting the berries picked. In the city it is so easy to take food for granted, so it seems valuable to experience the field if even for a moment!

You can get updates on Sam’s Facebook Page, find info about their farm and products at Savor Wisconsin or call them personally for specifics at 715-285-5351. I’m excited to make many trips to their farm this summer – think pickles!

IMG_1492


The Bee

Workers and Drones

IMG_1456

There sure is a lot of talk about bees lately. There are articles in the paper, news reports and documentaries. People are starting to get worried as they realize that if we want food, we need pollinators. The bee is in trouble, and talk around town is that we better do something about it.

What can we do? How do we save the bee? Well, some people say we need to plant large tracts of native wild flowers. As human development in the form of farming and settlements increases, we are effectively removing much of the bees’ food source. The USDA is trying to entice farmers to turn over some of their farm land to wildflowers by offering subsidies. Hm…that sounds familiar…farm subsidies. Some people point their fingers at our farmers blaming them for pesticide use while Colony Collapse Disorder has many baffled. I certainly don’t have the answer, in fact, I know nothing, but I love food and honey, so I have some bees.

I likely wouldn’t have bees if my dad wasn’t a beekeeper and my husband a willing apprentice. I likely wouldn’t have bees if I didn’t have the farm (although I do have a city neighbor I would enjoy irritating with bees!), and I likely wouldn’t have bees if I hadn’t started making my honey balsamic dressing. Since Jeff and I started eating this stuff, we eat at least a quart of honey a month.

We have two colonies of very beautiful bees, and yesterday was the day that Jeff decided to add a second layer to the new colonies. My dad delivered the bees in early May and at that time, the colonies were set up with four old frames, or foundations, that already had honey built up, and we added a number of new wax frames so the bees could go to work building brood comb to make babies. They have been busy! They almost filled all the frames, so we knew they were close to outgrowing their hive. In fact, I told Jeff last Thursday that while feeding the bees I had seen both queens. He got worried thinking that her presence on the top of the hive may indicate the need to move – or swarm! Fortunately we didn’t need to do any on-the-job-training catching a swarm and getting it back home!

So, with the smoker all set, the new frames ready to go and the colony open for business, Jeff took a deep thoughtful breath and jumped in!

IMG_1457

IMG_1460

In the picture below, notice the new frames leaning up against the hive. The first hive was divided into both boxes and then new frames were added to fill the two boxes.

Right as Jeff was tending the bees, the farmer neighbor came through with fertilizer! We can do our part to have bees and grow masses of wildflowers, but it’s going to take some major economic restructuring to convince the corn-growers to change their ways.

IMG_1463

And, someday our bee yard won’t be a patch of weeds! That project is on the docket queuing up!

IMG_1466

Poppin’ Up Around the Farm

IMG_1410

Quite a few little projects have been popping up around the place the last couple of weeks. I fell in love with some herbal tea my dad brought from Ithaca last summer, so have set to making my own. Jeff devised this great drying system so I can keep the herbs drying as they come in throughout the summer. I’ve already dried bunches of clover, camomile, catmint, peppermint, roses, angelica, and nettles.

IMG_1396

Last week the garden gate got updated with a sheet metal “roof” as well as one of the many old rusted garden implements found on the property. As Jeff finds the old tools, machine pieces and junk, he’s been stacking them in a perennial garden. The junk is taking on a bit of an artistic bend!

I might end up planting some sort of flowering vine around the gate to soften the entrance and welcome the bees. The garden fencing is semi-temporary as we are not sure whether the garden will live forever in this site, but I love the idea of creating espaliered fruit fencing or a vined structure of some sort. To appease my dreams this year, the tomatoes will grow in the espalier form against the fence.

IMG_1397

Another of our projects was to create a nice container for compost. Last year I just mounded all compost material which worked out fine, but didn’t have such a nice tidy look to it. With my sweeper attachment for the mower, I went crazy filling the new composter with grass. It’s so nice to have all the grass to cover the kitchen scraps as they come out, and I find it so convenient to have the grass on hand for quick mulch needs. The bottom foot of the compost is burdock leaves! I have a feeling the compost will consist largely of burdock leaves for many years as I work to eradicate (or at least slightly tame) the beast from our property. I have read that it can be used in tea, so some day may be kicking myself if the herbal tea business starts to boom!

IMG_1405

Talk about booming! Yesterday I pulled one radish out of the bed, but the others still looked a little small. For fourteen hours yesterday lightning filled the sky, rain poured down in buckets and thunder rippled through the atmophere. This morning the radishes had literally jumped out of the soil! I don’t know if they were electrocuted or what, but bursting is an understatement!

IMG_1406

In fact, the entire garden burst after last night’s rain. Tomato suckers that I picked on Friday had grown back two inches today, and everything seemed to have doubled in size overnight.

IMG_1411

Last night’s storm took down a very old apple tree and coincidentally, my parents gave Jeff a Honeycrisp for his birthday. Out with the old, in with the new!

First Year Garden

Maiden Rock, Wisconsin the second week of May… Trees were barely open, the grass was short but bright green and sleet-snow fell from the sky.

IMG_1334

The following day was bright and clear. Our farmer neighbor brought in the tractor to plow under the winter rye in our new garden and implement composted manure from his steer. We let that rest for one week. We chose this site in front of the barn for our first garden as it had been the paddock. Our hope was that the soil would already be fairly fertile with nearly thirty years of horses on the area. The soil in the part of the world is a silty loam that drains quickly.

IMG_1339

The following week we dug and moved a MILLION pounds of soil to form our “no-till” garden beds. These will be added to each year with layers of mulch, compost, leaves and grass clippings. The first layer was straw and grass clippings to hold in the moisture and allow the beds to rest again.

IMG_20140518_131749_121

IMG_1341

The following week, “Superman,” as one of my friends refers to my husband, installed the fence while I planted all the seedlings started in March as well as all the seeds from the seed box in the farm office. We’ll see if my intensive tomato trellising plan for the fence works!

IMG_1349

In just a couple of weeks, this land went from barely Spring to FULL-BLOWN Summer complete with 90 degree days and weeds popping up left and right! My work for the summer is clearly defined – weed eradication will be the name of the game! My tools: one pair of gloves, a strong back, and the dream of a goat, some chickens or a duck! Fortunately, my seeds and seedlings are a bit ahead of the weeds, and I’m ready with mulch! The garden was entirely planted by May 25th this year.

IMG_1373

The picture above was taken the first week of June. As you can see there are two beehives behind the garden. We’re taking a dive into beekeeping as well. We refer to the bees as “The BEE!” If we don’t use the singular, my dad, the beekeeper, might end up bringing 25 hives to our land!

IMG_1406

Our Father’s Day garden popped with radishes, collard greens, green onions and mustard greens. Tonight’s salad will include a bit of arugula!

By the end of June, it was jammin’ all of the above with the addition of baby bok choy, basil, peas and lots of green tomatoes!

IMG_1467

A Farm Office

IMG_0560

This was the stinky room in the house. Don’t get me wrong, the whole house reeked, but this one was tops. I suspect it had been used as the potty for the cats and dogs that took up residency as the smell of urine overpowered the room and the floor was clearly saturated with the slightly oily residue urine leaves behind. I used about a gallon of one of those pet enzyme odor eliminators, sprayed over the course of a few weeks while I was working upstairs, and washed the floors a few hundred times with bleach, but it wasn’t until I primed the space that the odors completely disappeared.

In the 80s remodel, owners moved the staircase and changed the shape of it. With evidence from original door jams that could be seen on the floors, I was able to see how the original staircase would have entered from the kitchen through a doorway. It would have been a steep incline up to the original two bedrooms. This would have allowed for the lofted bedroom to be bigger, perhaps even having a closet. The new staircase is ample with a landing allowing for the upstairs to have a large, open feel. Overall, it was a good design move for the house.

The office is now in the room off the living room that is partially under the staircase. We boxed in the area under the landing in order to accommodate a daybed, but this space could have been used for a small closet, drawer storage or left open. Since it smelled as if the cat boxes were stored there, I was happy to prime and seal it up. There is no odor anymore!

The previous owner never finished the walls the new walls andthe original plaster wall was covered in wallpaper that easily peeled off with warm water and a scraper as the plaster had been only roughly finished. We put up new sheetrock and I skim-coated the plaster to finish. I am so happy with the results. It’s a beautiful, sun-filled room!

IMG_0561Before
IMG_1198After

IMG_0849

I am so thrilled with the way the daybed turned out! As you have seen, our interior design strategy has been to create a cottage look by painting everything. I like the clean yet unfussy nature of this concept – not to mention, the economic benefits! We have been able to build custom pieces and with hole-filler, caulk and paint, make everything look really fresh. All the furniture pieces in the office were built with pine and a bit of recycled moulding allowing me a budget for the final touches!

IMG_1167

Our second floor bathroom is en suite, so anyone staying in the other two bedrooms must walk through the master to access it. While this is fine for family, friends and other guests may feel a little awkward with that arrangement, so part of my decision to add a day bed to the office was to add a space for guests that would allow them their own bathroom. The bed will have a roll-out lower bed so two can stay comfortably in that room.

IMG_1180


Office with daybed

The Office

IMG_1199

IMG_1273


IMG_1274


In the next post you’ll see what I did with all these seeds!